
Yesterday I spent the best day with my Mama. We walked around Fort Langley, BC and snooped in all the beautiful shops. I always find so much inspiration looking in the shops. While I was there I found some beautiful baby hats and, of course, thought to myself...I can make that!
I decided to make some boys hats first...girls hats to follow at a later date.
I started by making a pattern for myself. Sorry, I do not have a pattern for you to download...I have no idea how to do things like that yet. What I did was folded my fabric in half and cut my pattern in sort of a tube shape. In the picture the bottom of the tube is the fold and I began cutting at the curved edges and across the top.
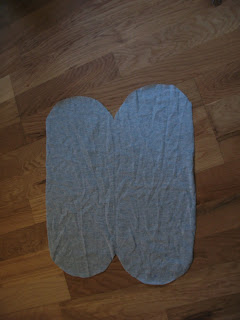
This is what the fabric looks like when unfolded. I know, the picture looks like it is crooked...it is not. Next you need to fold the fabric in half with the right sides together.

Then you will need to sew with a zig zag stitch all around your cut edges. You can pin your fabric together first to make sure the fabric does not slip...I did not. Make sure you leave a small opening for turning your fabric right side out again...so that means...do not sew all the way around.

This is what it should look like when you are done turning it inside out. Now you need to sew up the opening. You could hand sew it so that you don't see any stitches...I didn't. Surprise, surprise. I just used a zig zag stitch to sew it up. Then all you need to do is turn one end into the other. I turned the end with the stitches showing to the inside of the hat so that you wouldn't see them.

Done! Now to embellish!

I used some pieces of jean and cut out shapes. I cut out a small car and a little boat and used liqui-stitch to glue the appliques on to the hats. Then I used some embroidery thread to sew on some button wheels and sew a mast to the boat.

Sew cute!
Love it...you are the most crafty!!! Might make a few myself.
ReplyDelete